 |
| Crazy Patch Mitten ornaments |
This year I decided to make crazy patch mitten ornaments for the adults that came for Christmas and also for my two students I still teach. This was somewhat inspired by the leftover fabric that I had from making my granddaughter's second Christmas stocking.
 |
| Finished ornament |
I had seen on Facebook that someone else had personalized the ornament with the year (and also a saying). I used my software to add the year to the ornament and also rearrange the order so it would sew before the finishing steps.
 |
| Backs of finished ornaments |
The directions from Designs by JuJu are very complete so it was easy to follow along.
 |
Batting tacked down
|
 |
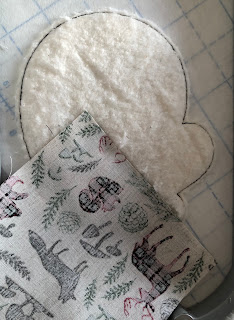
| Batting trimmed |
First you hoop tear-away stabilizer. I used two different ones, the first was a little softer but the second tore more cleanly. Since these were ornaments to hang on the tree I used the second one (Pellon 806 Stitch-N-Tear) even though more crinkly. The first stitch line was a placement line for the batting. I placed the batting down and then it stitched the tack down stitches. Then I trimmed close to those stitches.
 |
| Placement line for first fabric |
 |
| First fabric in place |
 |
| First fabric tacked down |
 |
| First fabric trimmed |
Next were the placement stitches for the first fabric. I placed the first fabric down and then it stitched the tack down stitches. When trimming I had to make sure I left enough around the outside for the final trimming.
 |
| Placement line for the second fabric |
 |
| Second fabric in place |
 |
| Second fabric, seam stitched |
 |
| Second fabric flipped over |
 |
| Second fabric tacked down |
 |
| Second fabric trimmed |
For the second fabric, it stitched a placement line, but only where the seam would be. I placed the fabric right side down and then it stitched the seam. Then I flipped the fabric over and finger pressed the seam (you could use a small iron if you want). The machine stitched the tack down stitches and I again trimmed around.
 |
| Decorative stitch with metallic thread |
Next up was the decorative stitch on the seam. I used a metallic thread and slowed the machine down for it. It wasn't until the last ornament or two that the thread started to give me some problems. These steps were repeated for each of the four fabrics.
 |
| Ribbon taped in place |
 |
| Backing taped in place |
 |
| Ready for the final stitch |
Next up were the final sewing steps. The machine stitched a placement line for the ribbon. I then taped the ribbon in place on the back of the hoop. After the machine stitched the tack down stitches for the ribbon, I removed the tape from the ribbon and then taped the backing in place. The machine did the tack down stitching all around before it did the final bean stitch.
 |
| Tearing away the stabilizer |
The final steps were to remove it from the hoop, tear away the stabilizer and then cut around the edges with pinking shears being careful not to cut the ribbon. This was a fun project. I can't wait to make some of the other ornaments for the upcoming Christmases.


No comments:
Post a Comment